Mastering the Art: A Step-by-Step Guide on How to Tie Shoes
The Classic Knot: A Foundational Step-by-Step Guide on How to Tie Shoes
-
Step 1: The Initial Cross and Knot
Take one lace in each hand. Cross the right lace over the left lace, creating an "X" shape directly above the top eyelets. Now, tuck the end of the right lace under the left lace, passing it through the opening in the center of the "X". Pull both laces firmly, but gently, away from each other until a snug knot forms at the base of your shoelace array. This is the foundation of your knot, ensuring everything else stays secure.
-
Step 2: Form the First "Bunny Ear" Loop
With the laces still in your hands, take one lace (it doesn't matter which one, let's say the left one for now) and create a loop. Hold this loop between your thumb and forefinger. The loop should stand upright and be about 1-2 inches tall, resembling a rabbit's ear.
-
Step 3: Form the Second "Bunny Ear" Loop
Now, take the other lace (the right one) and create an identical loop. Hold this second loop between the thumb and forefinger of your other hand. You should now have two symmetrical loops, one in each hand.
-
Step 4: Crossing the Loops
Carefully cross the two loops over each other, just as you did with the initial laces in Step 1. For instance, cross the left loop over the right loop, forming another "X" shape with the two loops.
-
Step 5: Tucking and Pulling Tight
Take the top loop (the one that is now over the other) and tuck it underneath the bottom loop, threading it through the hole that formed in the middle of your "X" of loops. Once it's through, grasp both loops firmly and pull them away from each other simultaneously. You'll see the knot tighten, forming a secure bow.
-
Step 6: Adjust and Secure
Once you've pulled tight, give the loops a final tug to ensure the knot is snug against your shoe. Make sure the bow is centered and the loops are even. Congratulations, you've successfully followed this step by step guide on how to tie shoes using the classic method!

Moving forward, it's essential to keep these visual contexts in mind when discussing Step By Step Guide On How To Tie Shoes.
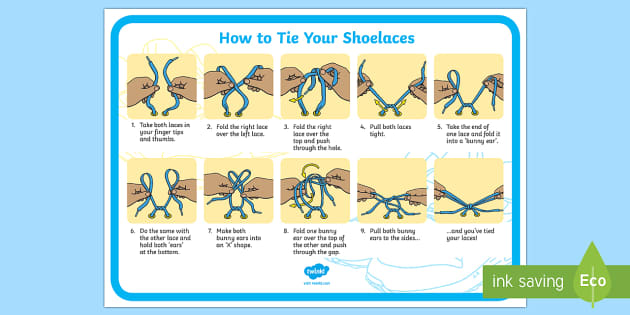
An Alternative for Beginners: The "Two-Loop" or "Bunny Ears" Method
While the classic knot is fantastic, some find the "bunny ears" method easier, especially when teaching children or for those with developing fine motor skills. It simplifies the looping process.
-
Step 1: The Initial Cross and Knot
Just like in the classic method, start by crossing the laces and tying a single, foundational knot. Pull it snug.
-
Step 2: Form Both Loops Simultaneously
Take both laces and create two "bunny ear" loops at the same time, one with each lace. Hold each loop firmly between your thumb and forefinger.
-
Step 3: Cross and Tie
Cross these two loops over each other. Now, instead of one loop tucking under, simply take one loop and pass it *through* the hole created by crossing the two loops. Pull both loops outwards until the knot tightens. This method is often quicker for beginners to grasp because the "tucking" motion is less complex.
Once you've mastered this fundamental step by step guide on how to tie shoes, you'll unlock a new level of independence and convenience. From there, you can explore other lacing techniques for different shoe types, ways to make knots even more secure, or even decorative lacing patterns. The world of shoelace mastery is vast!
Tying your shoes is more than just a chore; it's a foundational skill that contributes to safety, comfort, and self-reliance. By following this detailed step by step guide on how to tie shoes, you now have the tools and knowledge to confidently tackle this everyday task. Whether it's for yourself, a child, or simply to refine your technique, remember that patience and practice will lead to perfect knots every time. So go ahead, pick up a pair of laces, and start tying with confidence!


 - wikiHow")